
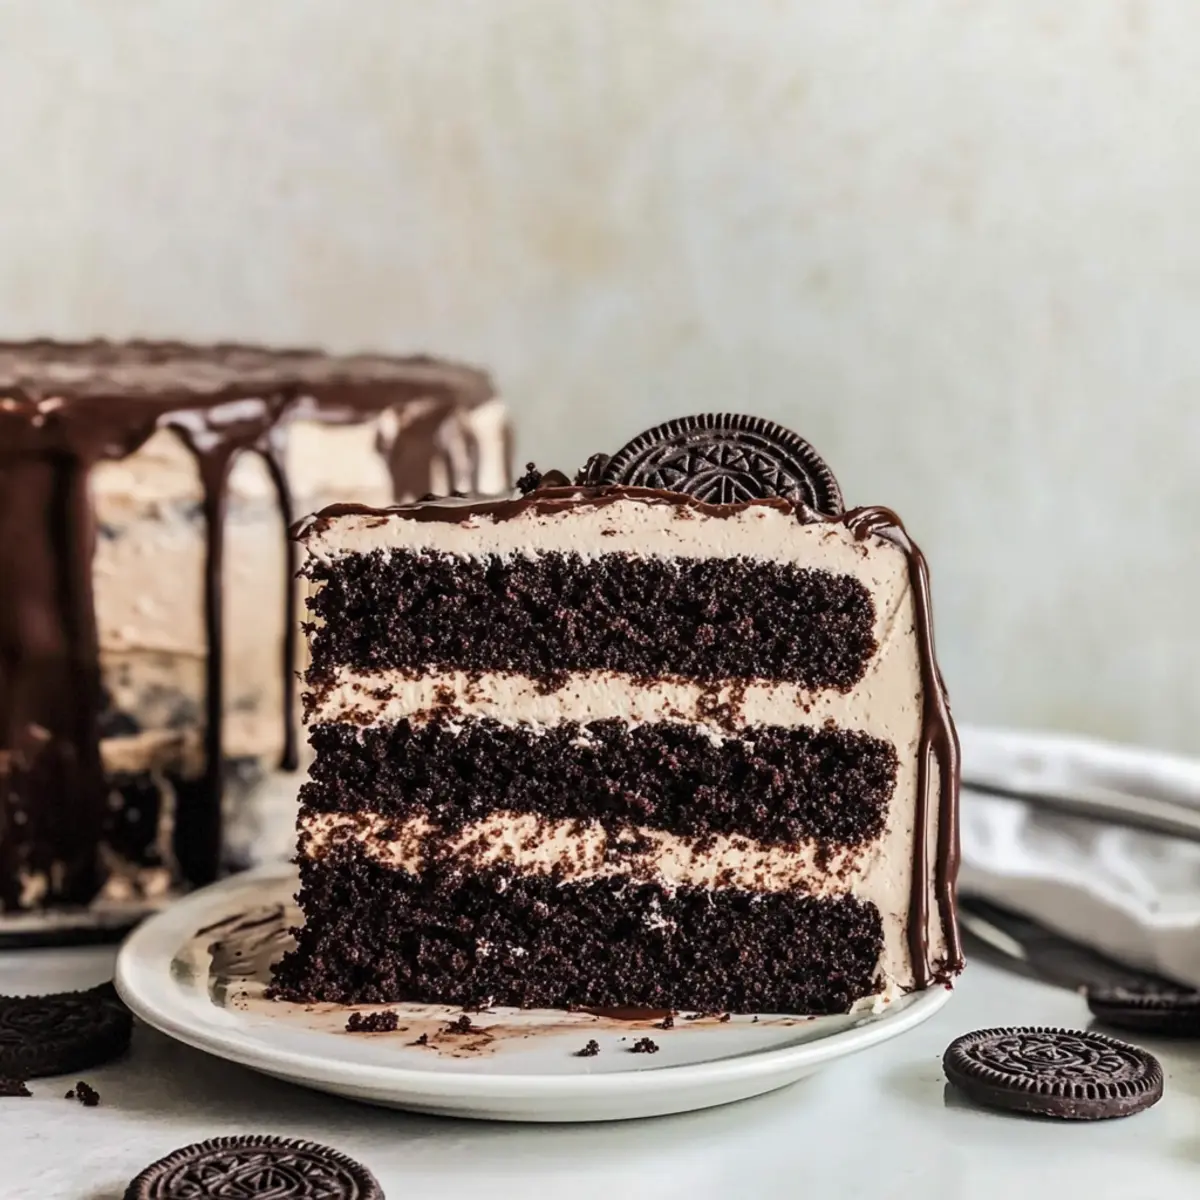
As I sift through my recipe box, the familiar sight of an Oreo cookie bundle brings back sweet memories of family gatherings and indulgent celebrations. Today, I’m thrilled to share my Ultimate Layered Oreo Cake with Cream Cheese Frosting—a dessert that perfectly captures the essence of the beloved Oreo. This cake is not just about its layered, moist chocolate base filled with rich Oreo cream; it’s also a guaranteed crowd-pleaser that’s surprisingly quick to prepare! With a creamy Oreo buttercream and a glossy drizzle of chocolate ganache topping it off, this delightful treat is perfect for special occasions or just a cozy night in. Ready to elevate your dessert game and impress everyone around the table? Let’s dive into this layered fantasy!

Why is this Oreo Cake irresistible?
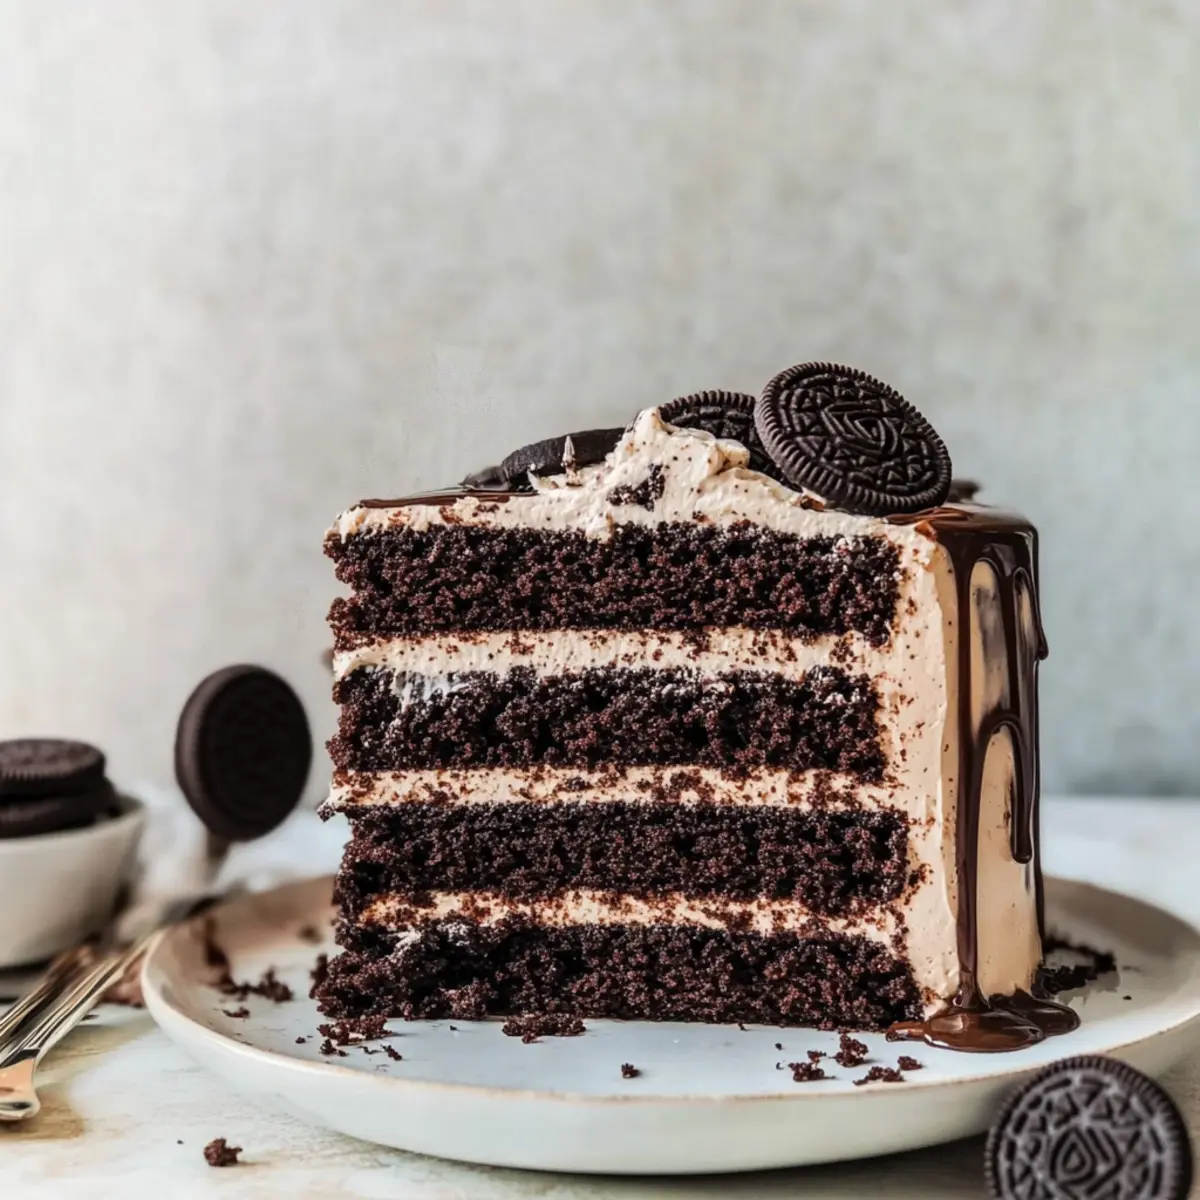
Decadent Layers: Each slice of this cake is bursting with layers of moist chocolate goodness and rich Oreo cream, making it perfect for dessert lovers.
Quick Preparation: You’ll be amazed at how quickly this showstopper comes together—all it takes is a few easy steps!
Crowd-Pleaser: Whether it’s a birthday party or a cozy gathering, this cake is guaranteed to win hearts and sweeten smiles, reminiscent of gatherings filled with laughter and joy.
Flexibility: Feeling adventurous? You can easily swap out Oreos for other cookies, or transform the batter into delightful cupcakes!
Luxurious Frosting: The creamy Oreo buttercream paired with a glossy ganache creates an indulgent treat that feels like a slice of heaven.
Enjoy this delightful experience, and maybe pair it with some Strawberry Cheesecake Truffle for an extra sweet celebration!
Oreo Cake Ingredients
For the Cake
• All-purpose flour – Provides the structure of the cake. Ensure flour is spooned and leveled for accuracy.
• Cornstarch – Lightens the texture for a fluffier cake. Can be replaced with more flour if needed.
• Dutch process cocoa powder – Adds deep chocolate flavor. Natural cocoa powder can be substituted for a different taste.
• Baking soda & Baking powder – Leavening agents that help the cake rise to a light and fluffy texture.
• Salt – Balances sweetness and enhances flavors.
• White granulated sugar – Sweetens the cake. Brown sugar can be used for a moister texture.
• Buttermilk – Adds moisture and tanginess. Substitute with milk mixed with vinegar for a dairy-free option.
• Vegetable or canola oil – Keeps the cake moist. Melted coconut oil can be used for flavor.
• Large eggs – Binds ingredients and provides structure. Room temperature eggs yield better results.
• Pure vanilla extract – Adds flavor depth. Use vanilla bean paste for a more robust flavor.
• Hot water – Hydrates cocoa powder and helps activate the dry ingredients for a richer chocolate taste.
For the Filling
• Cream cheese – Base for the whipped filling. Make sure it’s at room temperature for easy mixing.
• Heavy cream – Whipped for lightness in filling and frosting. Substituting with coconut cream works for dairy-free needs.
• Oreos – Provides flavor and texture in both the filling and as decoration.
For the Frosting
• Butter – Creates a creamy texture for the frosting. Use unsalted for better control over sweetness.
• Powdered sugar – Sweetens and thickens the frosting. Sifted sugar helps avoid lumps.
• Oreo crumbs – Adds rich Oreo flavor to the frosting. Crush Oreos finely for a uniform blend.
For the Ganache
• Heavy cream – Helps melt the chocolate for a smooth finish. Use full-fat cream for best results.
• Chocolate chips – Provides the glossy ganache coating. Dark chocolate enhances depth; milk chocolate adds sweetness.
Embrace the joy of baking with this decadent Oreo Cake—it’s sure to become a cherished favorite in your home!
Step‑by‑Step Instructions for Oreo Cake
Step 1: Preheat and Prepare Pans
Begin by preheating your oven to 350°F (177°C). While the oven warms up, take three 8-inch cake pans, greasing and lining them with parchment paper to ensure easy release after baking. This step is vital for a perfect Oreo cake that will easily come out of the pans without sticking!
Step 2: Whisk Dry Ingredients
In a large mixing bowl, whisk together the all-purpose flour, cornstarch, Dutch process cocoa powder, baking soda, baking powder, salt, and white granulated sugar. This mixture sets the stage for a fluffy and rich cake. Ensure that everything is well combined, creating a light, airy dry ingredient base for your Oreo cake.
Step 3: Combine Wet Ingredients
In a separate mixing bowl, combine the vegetable oil, buttermilk, large eggs, and pure vanilla extract. Gradually mix in the hot water until the mixture becomes smooth and well-blended. The warmth from the hot water helps enhance the cocoa flavor and ensures your Oreo cake stays moist and delicious.
Step 4: Mix Dry and Wet Ingredients
Carefully pour the wet ingredient mixture into the dry ingredients. Gently stir until just combined; avoid overmixing to preserve the light texture of the cake. The resulting batter should be thick, rich, and chocolatey, making your Oreo cake irresistibly decadent.
Step 5: Bake the Layers
Divide the batter evenly among the prepared pans. Place them in the oven and bake for 20-24 minutes, or until a toothpick inserted in the center comes out clean. Once baked, let the cake layers cool in the pans for about 10 minutes before transferring them onto a wire rack to cool completely.
Step 6: Prepare the Filling
In a mixing bowl, beat the cream cheese and vanilla extract until smooth and creamy. Carefully fold in the whipped heavy cream and crushed Oreos. This Oreo filling will create a delicious contrast to the chocolate layers and adds a touch of creaminess that complements the cake beautifully.
Step 7: Make the Frosting
In a clean mixing bowl, beat the butter and cream cheese until fluffy and smooth. Gradually add the powdered sugar and continue mixing until fully combined. Finally, stir in the Oreo crumbs for a delightful frosting with rich flavor. This frosting will cover the layers beautifully, adding to the overall indulgence of your Oreo cake.
Step 8: Prepare the Ganache
Heat the heavy cream in a small saucepan until it begins to simmer then pour it over the chocolate chips in a bowl. Allow it to stand for a few minutes before stirring until smooth and glossy. This ganache will create a stunning finish, adding an elegant drizzle to your layered Oreo cake.
Step 9: Assemble the Cake
Start assembling your Oreo cake by placing one cake layer on a serving plate. Spread a generous layer of Oreo filling on top before adding the next layer. Repeat this process for the remaining layers, briefly freezing each layer to help set them. Once assembled, cover the outside of the cake with the delicious Oreo buttercream frosting and drizzle the ganache on top, allowing it to cascade down the sides.
Step 10: Decorate and Serve
For a beautiful finishing touch, decorate the top of your Oreo cake with whole or crushed Oreos. This adds visual appeal while accentuating the flavors. Let the cake set before slicing and serving it to your lucky guests, providing a stunning dessert that will surely impress everyone.
Oreo Cake Variations & Substitutions
Get ready to tailor this scrumptious Oreo cake to your liking with a few simple swaps and twists!
-
Gluten-Free: Use a gluten-free baking blend instead of all-purpose flour for a cake that’s just as delicious.
-
Dairy-Free: Substitute buttermilk with plant-based milk mixed with vinegar, and use coconut cream in place of heavy cream for the filling and frosting.
-
Healthier Sugar: Replace granulated sugar with coconut sugar or maple syrup for a more natural sweetness. This gives the cake a lovely depth while being a bit lighter on the conscience!
-
Flavor Booster: Add a splash of espresso to the hot water for a mocha twist that’s perfect for coffee lovers.
-
Extra Indulgence: Layer in some chopped dark chocolate or additional crumbled Oreos between the cake layers for a richer treat. It’s an extra surprise that everyone will love!
-
Cupcake Transformation: Pour the batter into cupcake liners for delightful mini Oreo cakes that are just perfect for snacking and parties—yielding about 24 standard cupcakes!
-
Add Fruit: Substitute a layer with fresh raspberries or strawberries for a fruity contrast that balances the rich chocolate beautifully. The tartness will elevate each bite!
Don’t forget to enjoy these variations with a scoop of vanilla ice cream on the side or perhaps some delightful Brown Butter Cake as an added sweet touch!
Expert Tips for the Best Oreo Cake
-
Room Temperature Ingredients: Ensure your eggs and buttermilk are at room temperature for a more evenly baked Oreo cake with better texture.
-
Don’t Overmix: Gently combine wet and dry ingredients to avoid a dense cake. Overmixing can lead to tough layers that lose their lightness.
-
Chill for Stability: After frosting your cake, chill it for about 10 minutes before drizzling the ganache. This prevents messy drips and keeps the layers intact.
-
Use Quality Chocolate: For the ganache, opt for high-quality chocolate chips. This will enhance the overall flavor and add a luxurious touch to your Oreo cake.
-
Customize Your Layers: Feel free to incorporate your favorite flavors by adding different crushed cookies or flavors of cream to the filling for a unique twist.
Make Ahead Options
These decadent Oreo cakes are perfect for meal prep enthusiasts! You can prepare the cake layers up to 24 hours in advance, baking and cooling them completely before wrapping them tightly in plastic wrap to keep them moist. Additionally, you can make the Oreo filling and frosting up to 3 days ahead; just store them in airtight containers in the refrigerator. When you’re ready to serve, simply layer the cooled cakes with the filling, frost the outside, and finish with the ganache drizzle. This way, you’ll savor every bit of flavor while saving time for busy weeknights, ensuring your Oreo cake is just as delicious as when freshly made!
How to Store and Freeze Oreo Cake
Fridge: Store leftover Oreo cake in an airtight container in the refrigerator for up to 3 days to maintain its moisture and flavor.
Freezer: For longer preservation, freeze the cake wrapped tightly in plastic wrap and aluminum foil for up to 2 months. Thaw overnight in the fridge before serving.
Reheating: If desired, warm individual slices in the microwave for about 10-15 seconds to revive their softness before indulging.
Layering: To prevent sogginess, avoid stacking uneaten layers and maintain frosting and fillings separate until ready to serve; this helps keep the Oreo cake fresh and delightful.
What to Serve with Ultimate Layered Oreo Cake?
Nothing complements the indulgence of this decadent dessert like a few delightful pairings that elevate your dining experience.
-
Vanilla Ice Cream: The creaminess of vanilla ice cream contrasts beautifully with the rich Oreo cake, creating a harmonious balance of flavors.
-
Berry Compote: Tart berries bring a refreshing acidity that cuts through the sweetness of the cake, enhancing each bite with a burst of flavor.
-
Chocolate Sauce: For true chocolate lovers, a drizzle of warm chocolate sauce takes this cake to decadent new heights, celebrating the chocolatey goodness.
-
Whipped Cream: A dollop of light, fluffy whipped cream adds an airy touch that beautifully complements the moist layers of the Oreo cake.
-
Fresh Mint Leaves: Not only for garnish, but fresh mint leaves add a pop of color and a refreshing hint that brightens the rich chocolate flavors.
-
Spicy Hot Cocoa: A warm cup of spicy hot cocoa spices up the dessert experience, bringing coziness and warmth to your gathering.
-
Coffee or Espresso: The bold flavors of coffee or espresso make for a perfect pairing, enhancing the chocolate notes for a truly decadent dessert experience.
-
Chocolate-Covered Strawberries: These sweet, juicy fruits add a touch of romance and indulgence that pairs well with the layered cake without overwhelming the palate.
-
S’mores Flavored Milkshake: A fun treat that echoes the flavors of the cake while providing a creamy, sweet beverage to sip alongside every bite.
Oreo Cake Recipe FAQs
What type of Oreos should I use for the cake?
Absolutely! You can use standard Oreos for the best flavor and texture, but feel free to experiment with different varieties, like Double Stuf or even seasonal flavors. Just make sure they are fresh and not expired for the best results!
How long can I store leftover Oreo cake?
You can store leftover Oreo cake in an airtight container in the refrigerator for up to 3 days. This will help maintain its moist texture and delicious flavor, ensuring every slice stays as delightful as the first.
Can I freeze the Oreo cake?
Definitely! To freeze your Oreo cake, wrap individual slices or the whole cake tightly in plastic wrap and then in aluminum foil. It can be saved for up to 2 months. When you’re ready to enjoy a piece, simply thaw it overnight in the refrigerator for the best texture.
What if my cake layers are not rising properly?
If your cake layers don’t rise as expected, check that your baking powder and baking soda are fresh—old leavening agents can hinder rise. Also, ensure you’re mixing the batter just until combined and not overmixing, which can lead to dense layers. Lastly, be mindful of the oven temperature; an oven thermometer can help ensure accuracy.
Is this Oreo cake safe for people with allergies?
This cake contains common allergens such as gluten (from flour), dairy (from buttermilk and cream cheese), and eggs. If you’re serving someone with specific dietary restrictions, consider using alternatives like gluten-free flour, dairy-free cream cheese, or egg replacements—just keep in mind that it may alter the texture and flavor slightly.
Can I make this Oreo cake dairy-free?
Absolutely! To create a dairy-free version, substitute buttermilk with a plant-based milk mixed with vinegar, use dairy-free cream cheese, and for the frosting or filling, you can replace heavy cream with coconut cream. This swap still allows you to enjoy the deliciousness of the Oreo cake while catering to dietary needs!

Decadent Oreo Cake with Creamy Ganache and Oreo Frosting
Ingredients
Equipment
Method
- Preheat your oven to 350°F (177°C) and prepare three 8-inch cake pans by greasing and lining them with parchment paper.
- In a large mixing bowl, whisk together the all-purpose flour, cornstarch, Dutch process cocoa powder, baking soda, baking powder, salt, and white granulated sugar.
- In a separate mixing bowl, combine the vegetable oil, buttermilk, large eggs, and pure vanilla extract. Gradually mix in the hot water until smooth.
- Pour the wet ingredient mixture into the dry ingredients and gently stir until just combined.
- Divide the batter evenly among the prepared pans and bake for 20-24 minutes, or until a toothpick comes out clean.
- Let the cake layers cool in the pans for about 10 minutes before transferring them onto a wire rack.
- In a mixing bowl, beat the cream cheese and vanilla extract until smooth. Fold in the whipped heavy cream and crushed Oreos.
- In a clean mixing bowl, beat the butter and cream cheese until fluffy. Gradually add the powdered sugar and then stir in the Oreo crumbs.
- Heat the heavy cream in a saucepan until it simmers, then pour over the chocolate chips and stir until smooth.
- Assemble the cake by placing one layer on a serving plate, adding filling, and repeating. Frost the outside and drizzle with ganache.
- Decorate the top with whole or crushed Oreos, let it set before serving.
Leave a Reply